
Dirty AC coils force your air conditioner to work harder for the same result, and that strain shows up as higher energy bills and, eventually, a shorter equipment life.
Cleaning them yourself is realistic for most light to moderate buildup, but the two coils in your system need different tools and different levels of caution.
This guide covers both processes, tells you which cleaning products actually belong in your cart, and flags the situations where paying a professional is worth it.
What Are AC Coils and Why They Need Cleaning
Your air conditioner doesn’t create cold air. It moves heat out of your home using two coils that work as a pair. The evaporator coil sits inside the air handler and absorbs heat and humidity from the air blowing across it.
The condenser coil sits outside and releases that same heat into the outdoor air.
Dust, pollen, pet hair, and yard debris settle onto both coils over time, coating the metal fins and blocking the airflow the system needs for heat transfer.
That coating acts like insulation: a dirty evaporator coil can lose up to 30 percent of its heat transfer efficiency, and a fouled condenser coil can push energy use up 20 to 25 percent.
For a broader preventive routine that keeps buildup from reaching that point, see our full seasonal AC maintenance checklist.
Evaporator Coil vs. Condenser Coil
Evaporator coil: the indoor coil, mounted above or beside the furnace or air handler, where refrigerant absorbs heat and moisture from the air inside your home.
Condenser coil: the outdoor coil, housed in the unit sitting outside your house, where refrigerant releases the heat it collected indoors into the outside air.
Both are usually copper tubing wrapped in thin aluminum fins, which is why they bend, dent, and corrode easily if handled roughly.
Signs Your Coils Are Dirty
- Your home takes noticeably longer to cool down than it used to, even on mild days.
- A musty or moldy smell comes from the vents, which often points to buildup on a damp evaporator coil.
- Ice forms on the refrigerant lines or the coil itself, a sign the coil can’t absorb heat properly.
- The outdoor unit looks visibly coated in dust, grass clippings, or cottonwood fluff.
- Your energy bill has crept up without a matching change in how often you run the AC.
- The system short-cycles, switching on and off more often than it used to.
How Often to Clean AC Coils
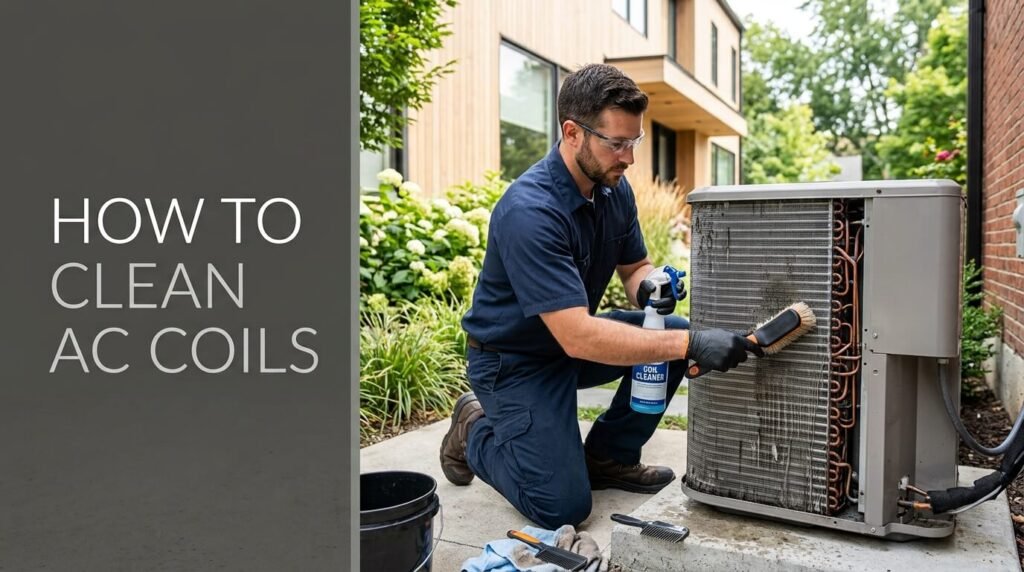
Most homes get by cleaning the evaporator coil once a year and the condenser coil twice a year, though climate and household habits shift that schedule in both directions.
| Coil | Recommended frequency | Adjust more often if… |
| Evaporator (indoor) | Once a year | You notice musty odors, high indoor humidity, or skip filter changes |
| Condenser (outdoor) | Twice a year | You live somewhere dusty or dry, have shedding pets, or have trees or grass nearby |
Evaporator Coil Cleaning Frequency
Once a year is enough for most homes, timed around the start of the cooling season so the coil starts clean before the system runs hardest.
Homes with pets, poor filtration, or chronic humidity problems build up grime faster and may need a check every six months instead. Skipping filter changes has the same effect: more debris ends up on the coil, and the interval between cleanings shrinks.
Condenser Coil Cleaning Frequency
Because it sits outdoors, this coil is exposed to grass clippings, pollen, and whatever else blows through your yard, so it typically needs attention twice a year rather than once.
Homes in dry, dusty climates or near heavy landscaping sometimes need a quick rinse every three months during peak season. A five-minute visual check each month tells you whether you’re ahead of schedule or behind it.
Tools and Supplies You’ll Need
Cleaning either coil takes a short list of tools you likely already own, plus a cleaning solution matched to how dirty the coil actually is.
A clean air filter matters just as much as the tools in your hand, since how often you change your AC air filter directly affects how fast the evaporator coil gets dirty again.
- A soft-bristle brush or a shop vacuum with a brush attachment, for lifting loose dust and debris.
- A fin comb sized to your coil’s fin spacing, for straightening bent fins.
- Work gloves, since coil edges and fins can cut skin.
- A garden hose with a gentle spray nozzle, not a pressure washer, for rinsing.
- A coil cleaner appropriate for the coil you’re treating.
- Safety glasses if you’re using a chemical cleaner.
Commercial Coil Cleaner vs. Homemade Solution
Reaching for top-rated AC coil cleaning sprays makes more sense than mixing your own solution once buildup goes beyond light dust, since commercial products are formulated for the specific coil type and grease load they’re treating.
| Features | Commercial coil cleaner | Homemade (vinegar/detergent) |
| Best for | Heavy grease, years of buildup, mold | Light dust, routine maintenance |
| Cost | $10 to $25 per can | Pennies per use |
| Application | Foams on contact, often no-rinse | Sprayed, left to sit, then rinsed |
| Risk to coil | Low, if formulated for the coil type | Moderate, if over-concentrated or left unrinsed |
| Where to buy | HVAC supply stores, hardware stores | Already in most kitchens |
A homemade vinegar solution works fine for routine touch-ups, but it isn’t a substitute for a real degreaser when a coil is coated in years of grime.
Is Vinegar Actually Safe for AC Coils?
Yes, when it’s diluted and rinsed off promptly. The confusion online comes down to concentration, not the ingredient itself.
A 1:1 mix of white vinegar and water is mild enough for occasional cleaning of light dust and film, and it won’t harm aluminum fins if rinsed away within a few minutes.
What actually damages coils is undiluted or concentrated vinegar left to sit, which can etch the fin coating and, over repeated use, contribute to corrosion.
For a quick monthly wipe-down, diluted vinegar is fine. For heavy, greasy buildup that’s gone untouched for a year or more, a commercial cleaner formulated for the job does a better and safer job.
When diluted vinegar is low-risk vs. when to skip it
Whether vinegar is a reasonable choice for your coil depends on a few specific factors, not a blanket yes or no.
- Diluted to a mild ratio, roughly one part vinegar to three or four parts water, and used no more than a few times a year, vinegar is considered low-risk by most HVAC maintenance sources.
- If your coil already shows white, chalky corrosion or visible pitting, skip vinegar entirely and use a pH-neutral dish soap solution instead.
- In coastal areas or homes with a water softener that adds salt to the air handler’s environment, avoid vinegar, since salt dramatically accelerates the same corrosion mechanism.
- If your coil is less than a few years old and shows no existing corrosion, an occasional light vinegar application is unlikely to cause a measurable problem.
Which Chemicals Are Actually Used for Coil Cleaning
| Cleaner type | What it’s for | Notes |
| Alkaline foaming cleaner | Standard grease and grime removal on condenser coils | Most widely used by HVAC pros, rinses clean |
| No-rinse coil cleaner | Evaporator coils with limited drainage | Drips into the drain pan instead of requiring a rinse |
| Acid-based cleaner | Heavy mineral or rust buildup | Should not be used indoors; requires full rinsing |
| Diluted vinegar or dish soap | Light routine maintenance | Safe in small amounts, not a substitute for degreasers on heavy grime |
Acid-based cleaners handle extreme cases, but they belong in a professional’s kit, not a homeowner’s. A cleaner made for condenser coils isn’t automatically safe for the more delicate, harder-to-rinse evaporator coil, so check the label before buying.
How to Clean the Evaporator Coil (Step-by-Step)
Cleaning the evaporator coil means working near electrical components inside your air handler, so power stays off from start to finish.
- Turn off power at the thermostat and at the breaker.
- Remove the access panel on the air handler, usually held by a few screws or spring clips.
- Vacuum the coil surface with a soft brush attachment to remove loose dust before applying any liquid.
- Spray on a no-rinse coil cleaner or a diluted vinegar solution, covering the fins evenly.
- Let it sit for 5 to 10 minutes so the solution loosens embedded grime.
- Wipe with a damp cloth, or lightly rinse if the cleaner requires it, keeping water use minimal.
- Check the condensate drain pan and line for clogs while the panel is open.
- Let the coil air dry fully before closing the panel and restoring power.
Cleaning Without Removing the Coil
Most evaporator coils don’t need to come out of the unit to get clean. Opening the access panel gives you enough room to vacuum the surface and apply a cleaner directly, and a no-rinse product is built for that scenario since it drips into the drain pan instead of needing to be flushed out.
Pulling the coil itself is a job for a technician, since it usually means disconnecting refrigerant lines, and reconnecting them incorrectly can cause a leak.
The same access-panel approach applies to cleaning coils on a mini-split system, though the panel location and fin spacing differ from a central air handler.
When to Skip DIY and Call a Pro
- The coil is coated in thick grease or years of buildup rather than light dust.
- You can see mold growth spreading across the fins.
- The access panel is sealed or hard to reach without disassembling other parts of the system.
- You notice an oily residue, which often signals a refrigerant leak rather than ordinary dirt.
- Your system is still under manufacturer warranty, and the terms require professional maintenance.
Cleaning the Evaporator Coil on a Package Unit
Package units combine the evaporator and condenser coils in a single outdoor cabinet instead of splitting them between an indoor air handler and an outdoor condenser.
That setup changes the access point: instead of opening a panel inside your home, you remove an access panel on the unit itself, usually on the side facing the return duct.
The cleaning steps match a standard evaporator coil once you’re inside, but since the whole unit sits outdoors, check for pest nesting and debris intrusion before you start, since package units collect outdoor grime on both coils at once.
How to Clean the Condenser Coil (Step-by-Step)
The outdoor coil handles heavier debris than the evaporator coil, so the process leans more on rinsing and less on wiping.
- Cut power at the outdoor disconnect switch or breaker.
- Clear leaves, grass clippings, and vegetation growing within two feet of the unit.
- Remove the top grille and side panels, setting screws aside so you don’t lose them.
- Vacuum or brush off loose surface debris before applying any cleaner.
- Apply a foaming condenser coil cleaner evenly across the fins.
- Let it sit for the time listed on the product, typically 10 to 15 minutes.
- Rinse from the inside out with a gentle hose spray, never a pressure washer.
- Inspect the fins for bends and straighten them with a fin comb if needed.
- Let the unit dry, then reassemble the panels before restoring power.
Straightening Bent Fins Safely
- Match the fin comb size to your coil’s fin spacing, usually printed on the comb’s packaging.
- Insert the comb gently into the bent section, working parallel to the fin lines.
- Pull the comb through in one smooth motion rather than forcing it, since aggressive pressure tears the thin aluminum.
- Repeat across any other bent sections, checking your work by sight after each pass.
Rinsing Without Damaging the Coil
- Use a garden hose with a standard spray nozzle, never a pressure washer, since high water pressure bends fins and drives dirt deeper into the coil.
- Spray at a slight angle rather than straight on, following the direction the fins run.
- Rinse from the inside of the unit outward so debris moves away from the coil instead of further into it.
- Keep water pressure low enough that you can hold the hose comfortably one-handed without bracing against the unit.
- If you’re using just a hose with no chemical cleaner, a gentle rinse every month or two during heavy pollen season helps prevent buildup from setting in.
DIY vs. Professional Cleaning: How to Decide
The coil’s actual condition matters more than how confident you feel with a wrench.
| Coil condition | Recommendation | Why |
| Light dust, first routine cleaning | DIY | Low risk, achievable with basic tools |
| Heavy grease or years of neglect | Professional | Needs stronger chemicals and experience to avoid fin damage |
| Bent or damaged fins | DIY with fin comb, or professional if extensive | A few bent fins are a quick fix; widespread damage needs a trained hand |
| Sealed or hard-to-reach panel | Professional | Forcing access risks damaging surrounding components |
| Suspected refrigerant leak (oily residue, hissing) | Professional | A safety and system issue, not a cleaning issue |
| Under active manufacturer warranty | Check terms; often professional | Some warranties require documented professional maintenance |
Light, routine buildup is genuinely a DIY job. Anything involving refrigerant, sealed panels, or years of neglect is worth paying for, both for safety and because a botched cleaning can end up costing more than the original service call would have.
What Professional Cleaning Costs
Professional cleaning typically runs $100 to $300, and where you land in that range depends on how many coils need attention and whether the visit includes a broader inspection.
| Service | Typical cost range |
| Standard coil cleaning (one coil) | $100 to $200 |
| Full evaporator and condenser cleaning | $150 to $300 |
| Cleaning bundled with a full HVAC tune-up | $100 to $300, often with inspection of other components |
That inspection is part of the value: a technician checking refrigerant levels and the condensate drain while already inside the unit can catch small problems before they turn into a failed compressor.
For a closer breakdown of what’s included, see the average cost of a full HVAC tune-up.
Warranty Considerations
Some manufacturer warranties, particularly on newer high-efficiency systems, require documented professional maintenance to stay valid.
DIY cleaning of the outdoor condenser coil rarely creates a warranty problem, since it’s the kind of basic upkeep manufacturers expect homeowners to handle.
Opening the evaporator coil housing or doing anything that touches refrigerant lines is a different story, and that can void coverage on some systems.
Check your warranty documentation, or call the manufacturer directly, before going beyond a surface-level evaporator cleaning on a system that’s still under coverage.
Cleaning AC Coils in an Apartment or Rental
- Check your lease before doing anything beyond basic surface cleaning, since many leases assign HVAC maintenance to the landlord or property management company.
- If you have a window unit or a portable AC, you likely have full access to the coils without needing permission, since these units belong to you rather than the building.
- For a central system serving your unit, ask your landlord whether coil cleaning is included in routine maintenance before scheduling anything yourself.
- If you do have access to a window unit’s coils, the same light-dust approach applies: vacuum first, then a diluted cleaning solution, then a light wipe rather than a full rinse, since these units aren’t built to handle much water.
- Photograph the AC’s condition before and after any cleaning you do, which protects you if a dispute comes up over the unit’s condition later.
Renters aren’t the only ones weighing DIY against calling someone in.
If you’d rather skip the ladder and the fin comb, schedule a professional AC tune-up and have a technician clean both coils, check refrigerant levels, and catch small problems before they get expensive.
Frequently Asked Questions
Can you use vinegar to clean AC coils?
Yes, as long as it’s diluted and rinsed off soon after application. A 1:1 mix of white vinegar and water is mild enough for routine dust removal on both evaporator and condenser coils, and won’t harm aluminum fins when used occasionally.
The risk comes from using vinegar at full strength or letting it sit for an extended period, which can etch the coating on the fins and contribute to corrosion over repeated use.
For heavy grease or years of buildup, a commercial coil cleaner formulated for the job is more effective and lower risk than trying to strengthen a vinegar solution.
Do you need to turn off the breaker to clean AC coils?
Yes, and this step matters more than most people assume. Turning off the thermostat stops the system from running, but the unit still has live power at the breaker, so components inside the air handler or condenser can still carry current.
Locate the breaker labeled for your AC or heat pump, usually near the main electrical panel, and switch it off before removing any access panel.
Many outdoor condensers also have a separate disconnect switch mounted right next to the unit, and cutting power there adds another layer of safety while you work.
Why does my AC coil keep freezing?
Why your AC coil keeps freezing almost always traces back to airflow across it dropping below what the system needs, and dirt buildup is one of the most common causes.
When dust and grime coat the coil, it can’t absorb heat properly, so refrigerant inside runs colder than it should and ice starts forming on the surface.
A clogged air filter, low refrigerant charge, or a failing blower motor can cause the same symptom, so if cleaning the coil doesn’t resolve repeated freezing within a cycle or two, have a technician check refrigerant levels and airflow instead of repeating the cleaning.
How much does professional coil cleaning cost?
Expect to pay somewhere between $100 and $300, depending on how many coils need attention and whether the service is bundled with a broader inspection.
A single, easily accessible coil on the low end of that range runs closer to $100, while cleaning both the evaporator and condenser, especially if either one is heavily soiled, pushes toward $200 to $300.
Many HVAC companies fold coil cleaning into a full seasonal tune-up at a similar price point, which adds value since the technician is already checking refrigerant levels and the condensate drain during the same visit.
If your coils are due for a cleaning and you’d rather not do it yourself, book a coil cleaning with our licensed technician by calling these numbers: 1) HVAC Technician Oscar – +234 806 051 8393 (Onitsha) or HVAC Technician Wokoma – +234 803 336 9201 (Port Harcourt), and get the rest of the system checked at the same time.